Migrate to Arfiti
Move your accounting data from any system to Arfiti — via the Migration Plugin, CSV upload, connectors, Claude chat, MCP tools, or API.
- An Arfiti account with admin access
- CSV exports from your current accounting system (or access to a supported connector)
This guide walks you through moving your accounting data from any existing system into Arfiti. Whether you are coming from QuickBooks, Xero, Merit Aktiva, a spreadsheet, or a legacy ERP, you will find the right migration path here.
By the end of this guide, your Arfiti entity will be fully operational: chart of accounts, vendors, customers, employees, items, dimensions, fixed assets, and opening balances — all in place, with historical transactions imported and balances reconciled. Claude will then have everything it needs to run your day-to-day finance operations.
Arfiti supports six migration paths. Connector Sync is the fastest when your current system is supported. The Migration Plugin for Claude.ai gives you an AI implementation consultant that guides you through a structured 5-phase process — discovery, setup, master data, opening balances, and verification. Bulk CSV Upload works for any system and gives you full control over field mapping. For small teams with fewer than 50 records per type, describing your data directly to Claude in chat is often the simplest option. Developers can use the MCP tools interface for scripted migrations, and any system-to-system integration can use the REST API.
Choose the path that matches your situation, or combine them — for example, use Connector Sync for vendors and customers, then CSV Upload for fixed assets and opening balances.
Choose Your Migration Path
Prepare Your Data
Good preparation makes the difference between a smooth migration and hours of debugging. Before you start importing, take 15 minutes to organize your source data.
Export Tips by System
QuickBooks Online: Go to Reports, run a Contact List for customers and vendors, an Item List for products/services, and a Chart of Accounts report. Export each to CSV. For transactions, use the Transaction List report filtered by date range.
Xero: Use Reports > Export Data for chart of accounts and contacts. For transactions, use the Account Transactions report. Xero exports are generally clean UTF-8 CSVs — no conversion needed.
Excel or Google Sheets: Save each sheet as CSV (File > Save As > CSV UTF-8). One file per entity type. Remove summary rows, totals, and merged cells before saving.
Merit Aktiva: Use the Connector Sync path instead — the Merit connector pulls data automatically without manual exports.
CSV Formatting Requirements
All CSV files must meet these requirements before upload:
- Encoding: UTF-8 (not Windows-1252 or Latin-1)
- Delimiter: Comma-separated (not semicolon or tab)
- Headers: First row must be column headers — no blank rows above
- Dates: ISO format preferred (
YYYY-MM-DD), orMM/DD/YYYY - Numbers: No thousands separators — use
1500.00not1,500.00 - Text: Quote fields that contain commas —
"Smith, John"
Tip: Open your CSV in a text editor (not Excel) to verify encoding and delimiters before uploading. Excel often re-saves files with Windows encoding.
Recommended Import Order
Import order matters. Some entity types reference others, and importing in the wrong order causes foreign key errors.
Required Fields by Entity Type
Path A: Connector Sync
Connectors provide the fastest migration path for supported systems. Rather than exporting CSVs, you connect Arfiti directly to your source system and it pulls data automatically — chart of accounts, vendors, customers, and historical invoices in one operation.
Available Connectors
Merit Aktiva — available now. Supports full data sync: chart of accounts, master vendors, master customers, AP invoices, AR invoices, and GL entries. Ideal if you are currently on Merit and want a clean cutover to Arfiti.
QuickBooks Online — coming soon.
Coming soon: QuickBooks Online connector is in development. Sign up to be notified when it launches.
Xero — planned.
NetSuite — planned.
How to Set Up a Connector
- Go to Administration > Connectors in the admin panel.
- Click Add Connector and select your accounting system.
- Enter your credentials in the secure credential form. Credentials are encrypted with AES-256-GCM before storage — never enter credentials in Claude chat.
- Click Test Connection to verify access.
- Click Sync Now to start the initial data pull.
For detailed connector setup instructions, see the Banking and Connector Operations guide.
Path B: Migration Plugin in Claude.ai
The Arfiti Migration Plugin turns Claude into a dedicated implementation consultant that walks you through a structured 5-phase migration process. Unlike describing data manually in chat, the plugin follows a proven methodology with checkpoints, validation, and intelligent analysis of your source data.
Requirement: This path requires Claude Cowork — the collaborative workspace where Claude can use plugins and connect to external tools via MCP. If you don't have Claude Cowork yet, you can use Path C (Bulk CSV Upload) or Path D (Claude.ai Chat) instead.
How to Install the Plugin
- Open your project in Claude Cowork at claude.ai.
- Install the Arfiti Implementation Consultant plugin from GitHub: github.com/ar-ti-fi/plugins/artifi-core-implementation-consultant. This ensures you always get the latest version and can refresh when updates are available.
- The plugin connects to your Arfiti account automatically via MCP.
For plugin details, see the plugin page on our site.
The 5-Phase Migration Process
Once installed, type /start-migration in Claude to begin. The plugin guides you through:
Phase 1 — Discovery: Claude asks about your current system, company type, cutoff date, and what data you have. It then recommends the best migration path (connector, CSV, or hybrid).
Phase 2 — Foundation: Set up your chart of accounts, bank accounts, and posting profiles. Claude can import your existing chart of accounts from a CSV or create one from a standard template.
Phase 3 — Master Data: Import vendors, customers, employees, items, and dimensions. Claude handles the MCP calls, validates data quality, and flags duplicates.
Phase 4 — Opening Balances: Upload your trial balance at the cutoff date. Claude's Advisory Intelligence analyzes your balance sheet and automatically detects what additional detail you need:
- If you have Accounts Receivable, Claude asks for individual unpaid invoices (for aging reports)
- If you have Accounts Payable, Claude asks for unpaid vendor bills (for payment scheduling)
- If you have Fixed Assets, Claude asks for the asset register (for automated depreciation)
Claude explains the tradeoff for each: "Without individual invoices, the total balance is still correct, but aging reports won't show individual receivables."
Phase 5 — Verification & Go-Live: Claude runs trial balance checks, balance sheet validation, AP/AR aging reports, and fixed asset reconciliation. Each checkpoint must pass before proceeding to go-live.
Available Commands
When to Use the Plugin
Use this path when:
- You want a guided, structured process rather than managing imports yourself
- You have a balance sheet or trial balance from your current system that Claude can analyze
- You need advisory intelligence to determine what subledger detail (AR/AP/FA) to import
- You're migrating from any system (the plugin supports connector, CSV, and hybrid approaches)
Tip: The Migration Plugin is the recommended approach for most companies. It combines the automation of connectors with the flexibility of CSV import, guided by an AI consultant that understands accounting.
Path C: Bulk CSV Upload
The Bulk CSV Upload wizard in the admin panel is the primary migration path for most organizations. It handles all 10 entity types through a consistent 6-step interface, with intelligent field mapping suggestions powered by Claude.
Step 1: Navigate to Bulk Import
Go to Administration > Bulk Import in the admin panel sidebar. You will see the import wizard with cards for all 10 entity types.
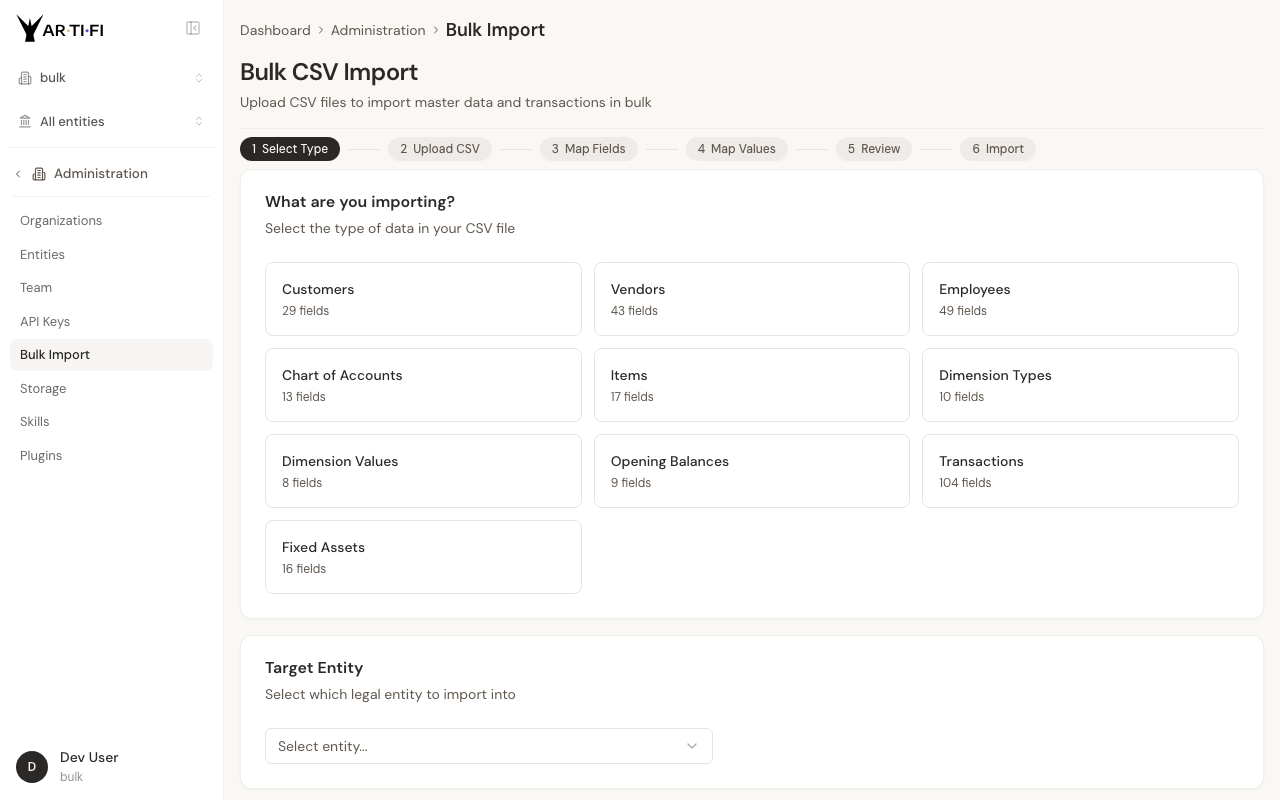
Click the entity type you want to import. Start with Chart of Accounts if this is a fresh migration.
Step 2: Select Your Target Entity
After selecting the entity type, choose the legal entity you are importing data into from the dropdown. In a multi-entity organization, this determines which entity the records belong to.
Click Next to proceed to file upload.
Step 3: Upload Your CSV
Drag and drop your CSV file onto the upload area, or click Choose File to browse. The wizard immediately shows a preview of the first 5 rows so you can confirm the data looks correct before continuing.
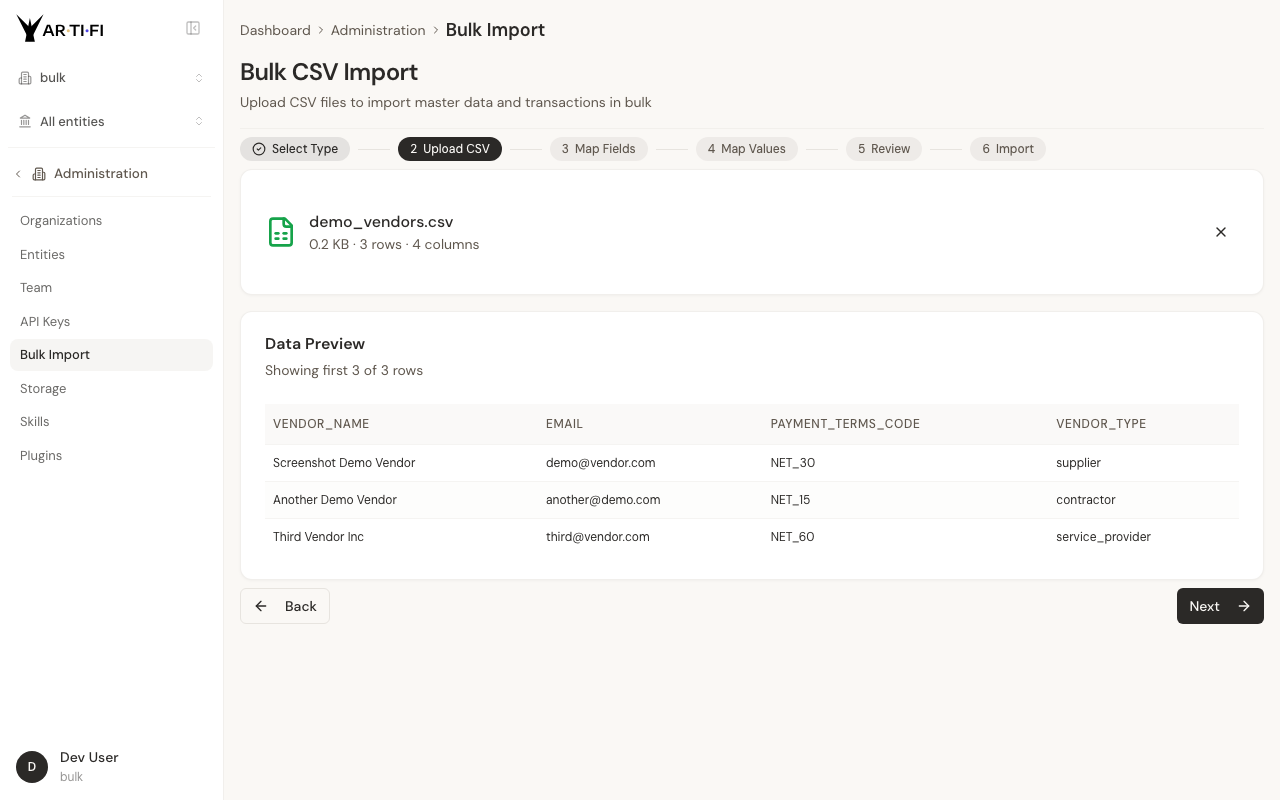
Check the row count and column count shown in the preview summary. If the numbers do not match your source file, go back and verify your CSV formatting — especially encoding and delimiter.
Click Next when the preview looks correct.
Step 4: Map Fields
The wizard automatically maps your CSV column headers to Arfiti target fields using intelligent name matching. Columns with exact or near-exact matches are mapped automatically and shown with a green checkmark.
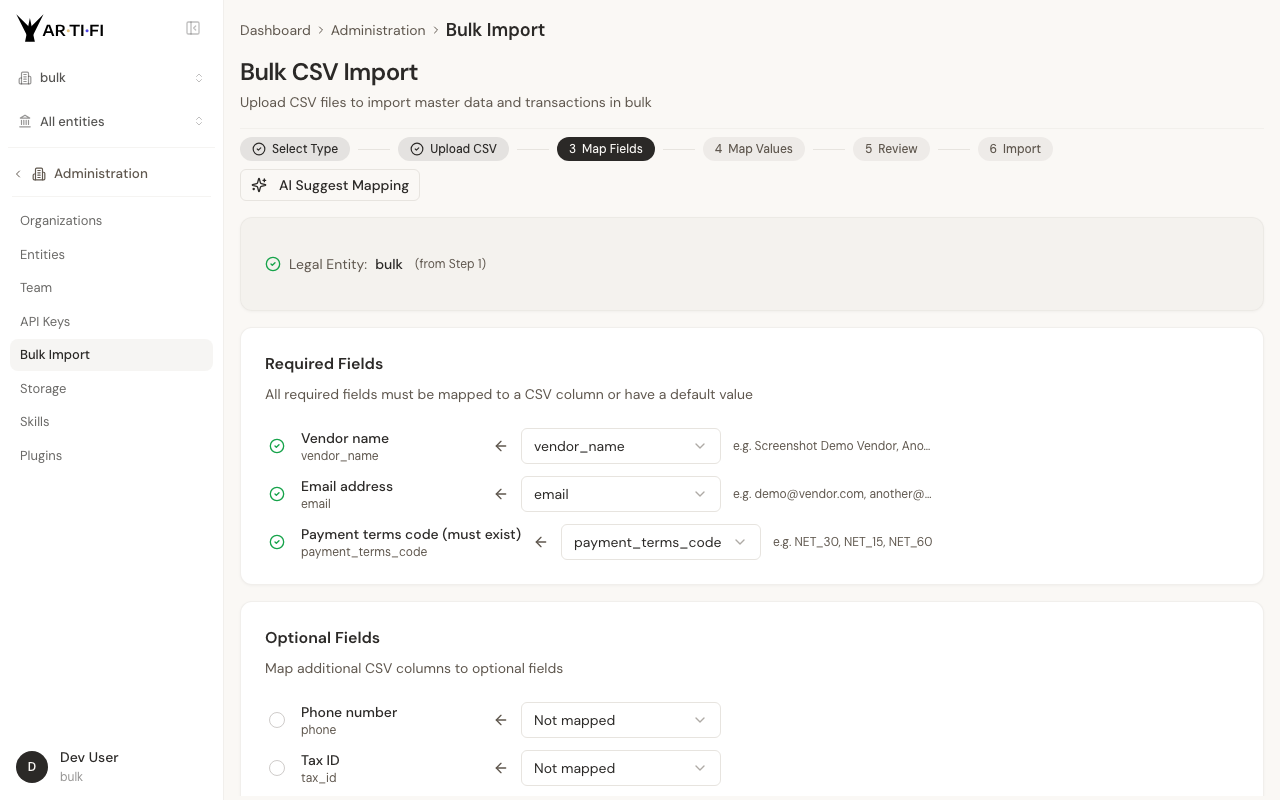
For columns that were not auto-mapped, use the dropdown on each row to select the correct target field. Required fields must be mapped before you can continue — they are highlighted if unmapped.
If you are unsure about a mapping, click AI Suggest Mapping. Claude analyzes your column names and sample data and suggests the most likely target fields with a confidence score.
For fields not present in your CSV at all — for example, if your source data has no currency column but all your vendors use USD — you can set a default value that will be applied to every record in this import. This is faster than adding the column to your CSV.
Click Next when all required fields are mapped.
Step 5: Map Values
Some fields reference other records in the system. For example, a vendor's payment_terms_code must match a payment term that already exists in Arfiti. The wizard extracts all unique values from those reference fields in your CSV and asks you to map each one to an existing system value.
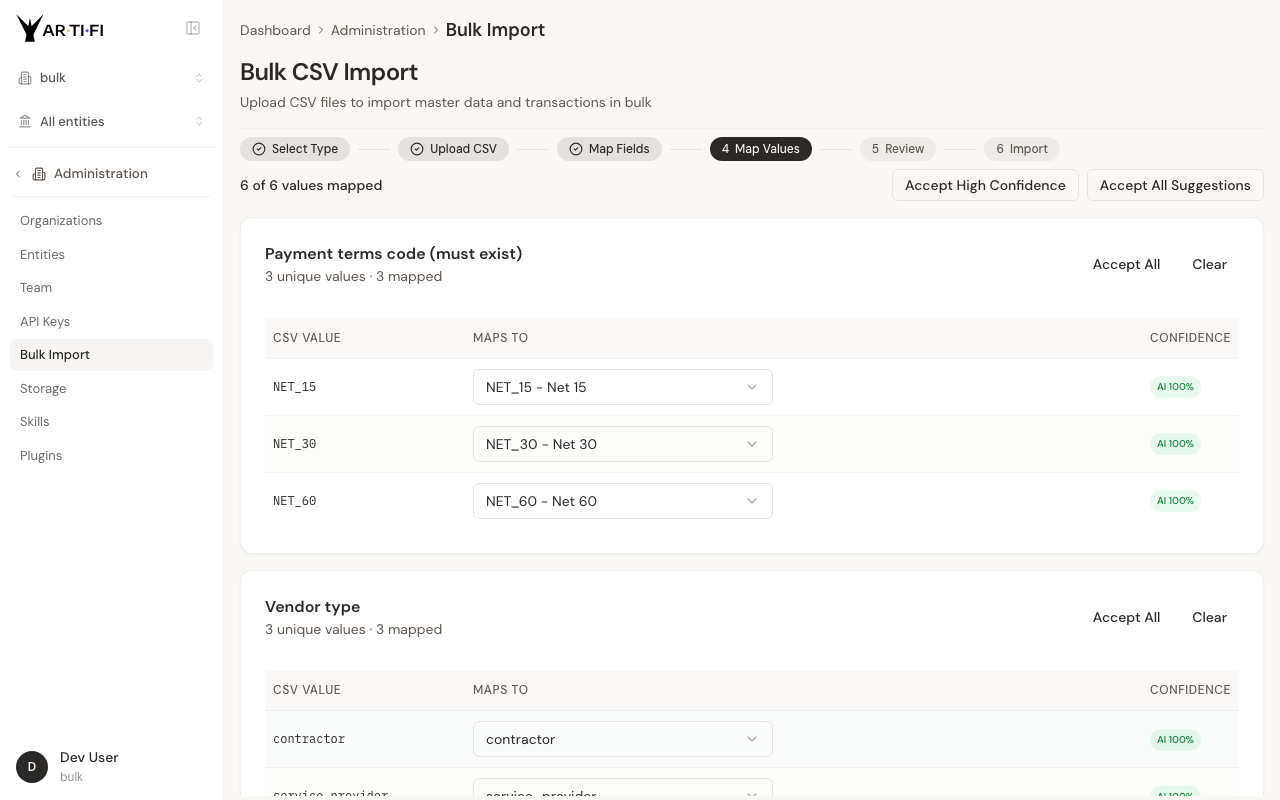
Claude suggests matches based on name similarity. A green badge with 100% confidence means the match is exact and will be applied automatically. Yellow badges indicate lower-confidence matches that you should review manually before confirming.
If a value in your CSV does not map to any existing system value, you can create the missing record first (for example, add a new payment term), then return to this step.
This step is skipped automatically if your CSV contains no reference fields.
Click Next to proceed to the final review.
Step 6: Review and Submit
The review screen shows a complete summary of what will be imported:
- Entity type and target legal entity
- Source file name, row count, and column count
- All mapped fields and their source columns
- Default values being applied
- Value mappings for reference fields
Read through the summary carefully. This is your last chance to go back and adjust before data is written to the database.
Click Start Import when you are satisfied with the configuration.
Step 7: Monitor Progress
For imports under 50 records, the result appears immediately. For larger imports, a real-time progress bar shows batch-by-batch progress as the import runs in the background. You can leave the page and return — the import continues.
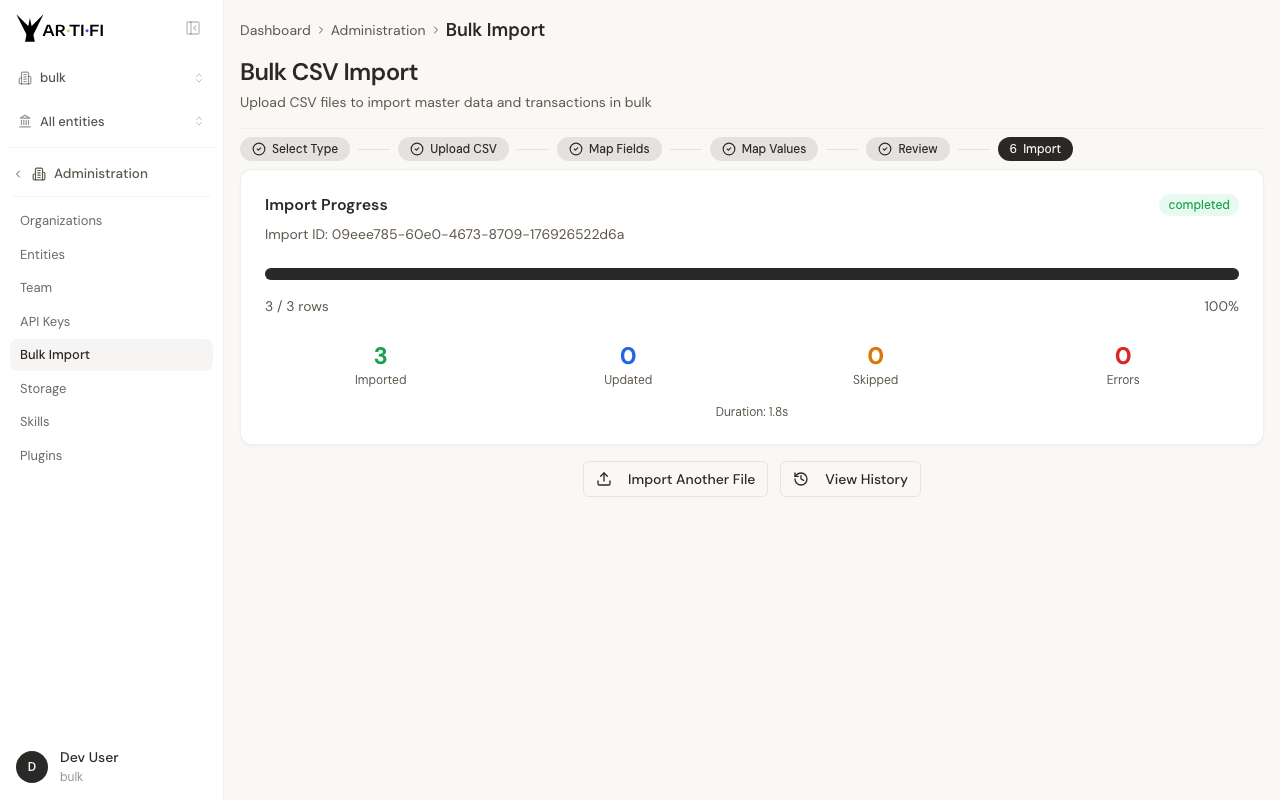
When complete, the results screen shows:
- Imported: new records created
- Updated: existing records modified (if you selected Update duplicate mode)
- Skipped: duplicate records ignored (if you selected Skip duplicate mode)
- Errors: records that failed, with row numbers and error messages
- Duration: total time for the import
If errors appear, they include the row number and a description of what went wrong. Fix those rows in your CSV and re-import with Duplicate Handling set to Skip — successfully imported records will be skipped, and only the previously failed rows will be processed.
Import Order: Entity-by-Entity Guide
Follow this sequence for a complete migration:
1. Chart of Accounts (13 fields)
This is the foundation. Every transaction, item, vendor, and customer references account numbers. Import this first, before anything else.
Key fields: account_number, account_name, account_type (asset, liability, equity, revenue, expense), account_subtype, currency, is_active.
2. Customers (29 fields)
Customer records are independent — they do not reference accounts or items. Import them early so AR invoices can reference them later.
Key fields: customer_name, customer_number, email, phone, currency, payment_terms_code, tax_id. Include billing and shipping addresses using the prefixed column convention described in the Sub-entities section below.
3. Vendors (43 fields)
Vendor records are also independent. Import before AP invoices.
Key fields: vendor_name, vendor_number, email, payment_terms_code, default_expense_account, currency, tax_id. Vendors support the most sub-entity columns — addresses, bank accounts, and dimension tags can all be included in the same CSV row.
4. Employees (49 fields)
Employees are independent of accounts and items. Import before payroll transactions.
Key fields: first_name, last_name, work_email, employee_number, department, job_title, start_date, currency.
5. Items (17 fields)
Items reference account numbers for revenue posting and expense posting. Chart of Accounts must be imported first.
Key fields: item_number, item_name, item_type (service, product, expense), revenue_account_number, expense_account_number, default_price, currency.
6. Dimension Types (10 fields)
Dimension types define the categories of dimensions your organization uses — Department, Project, Cost Center, and so on. Values come next, so types must exist first.
Key fields: dimension_type_name, dimension_type_code, is_required, applies_to.
7. Dimension Values (8 fields)
Dimension values are the individual options within each type — ENG, MKT, FIN under Department; PRJ-001, PRJ-002 under Project.
Key fields: dimension_type_code, value_code, value_name, parent_value_code (for hierarchies), is_active.
8. Fixed Assets (16 fields)
Fixed assets reference accounts for accumulated depreciation, depreciation expense, and the asset cost account. Import after Chart of Accounts. Optionally reference vendors if you want to track the original purchase.
Key fields: asset_number, asset_name, asset_category, acquisition_date, acquisition_cost, useful_life_years, depreciation_method, asset_account_number, depreciation_account_number.
9. Transactions (104 fields, up to 10 lines)
Transactions are the most complex entity type. They reference vendors, customers, employees, accounts, and items — all of which must already be in the system. Always import transactions last among operational data.
Supported transaction types include: AP_INVOICE, AR_INVOICE, JOURNAL_ENTRY, AP_PAYMENT, AR_RECEIPT, EXPENSE_REPORT, BANK_TRANSFER, CREDIT_NOTE_AP, CREDIT_NOTE_AR, and many more.
Header key fields: transaction_type_code, transaction_date, reference_number, vendor_id or customer_id, currency, description.
Line key fields (prefixed by line number): line_1_account_number, line_1_description, line_1_debit, line_1_credit, line_1_item_number, line_1_quantity, line_1_unit_price.
10. Opening Balances (9 fields)
Opening balances set the starting balance for each account at the beginning of your migration period. Import these after your accounts are set up and after you have configured your fiscal period in Arfiti settings.
Key fields: account_number, legal_entity_id, period_name (e.g., 2025-01), opening_balance, currency.
Tip: Run a trial balance in your source system as of your migration date. The sum of all opening balances you import should match that trial balance exactly.
Sub-entities: Addresses, Bank Accounts, and Dimensions in One Row
For vendors, customers, and employees, you can include related sub-entity data in the same CSV row using prefixed column names. This avoids needing separate import files for addresses and bank accounts.
Addresses
Use the billing_ and shipping_ prefixes for address fields:
billing_address_line_1, billing_address_line_2, billing_city, billing_state,
billing_postal_code, billing_country
shipping_address_line_1, shipping_city, shipping_state,
shipping_postal_code, shipping_country
Bank Accounts
Use the bank_ prefix to include a vendor or employee bank account:
bank_name, bank_routing_number, bank_account_number,
bank_account_type, bank_payment_method, bank_account_holder_name, bank_currency
Dimensions
Use the dim_ prefix followed by the dimension type code to tag records with dimension values:
dim_department, dim_project, dim_cost_center
For example, a vendor row with dim_department = ENG will be tagged with the Engineering department dimension automatically.
Transactions with Per-line Dimensions
Transaction lines support per-line dimension tagging using the pattern line_N_dim_type_code:
line_1_dim_department, line_1_dim_project
line_2_dim_department, line_2_dim_project
This allows each line of an invoice to be allocated to different departments or projects.
Path D: Claude.ai Chat
For small teams or simple data sets, the easiest migration method is to describe your data directly to Claude in a conversation. Claude will call the MCP tools and create the records for you in real time — no CSV preparation, no field mapping.
Example Conversation
You: I need to set up vendors for my company. We have 5 vendors:
     - Amazon Web Services, vendor type: service_provider,
       payment terms: NET_30, email: aws-billing@amazon.com
     - Office Depot, vendor type: supplier,
       payment terms: NET_30, email: orders@officedepot.com
     - Stripe Inc, vendor type: service_provider,
       payment terms: IMMEDIATE, email: billing@stripe.com
     - Gusto, vendor type: service_provider,
       payment terms: IMMEDIATE
     - WeWork, vendor type: service_provider,
       payment terms: NET_30, email: billing@wework.com

Claude: I will create these 5 vendors now. Setting up Amazon Web Services,
        Office Depot, Stripe, Gusto, and WeWork with the correct payment
        terms and vendor types...

        Done. All 5 vendors created successfully.
        - Amazon Web Services (vendor ID: 1042)
        - Office Depot (vendor ID: 1043)
        ...
When to Use Claude Chat
Use this path when:
- You have fewer than 50 records per entity type
- Records are simple — no complex sub-entities like bank accounts or dimension hierarchies
- You prefer describing data conversationally rather than preparing spreadsheets
Do not use this path when:
- You have more than 50 records per type (too slow and error-prone to describe individually)
- Records include bank account details (for security, use the admin panel's secure credential forms instead)
- You need an audit trail of exactly what was imported and when
- You plan to re-import or update records later from a source system
Path E: MCP Tools
Developers can call the import tools directly using the MCP protocol. This is useful for scripted migrations, automated data pipelines, or building custom import workflows on top of Arfiti.
Available Import Actions
The manage_imports tool supports all 10 entity types. Each action takes legal_entity_id and records (a list of objects):
Example: Import Vendors with Bank Accounts and Dimensions
manage_imports(
    action="vendors",
    legal_entity_id=74,
    records=[
        {
            "vendor_name": "Amazon Web Services",
            "email": "aws-billing@amazon.com",
            "payment_terms_code": "NET_30",
            "vendor_type": "service_provider",
            "bank_name": "Chase Bank",
            "bank_routing_number": "021000021",
            "bank_account_number": "9876543210",
            "bank_payment_method": "ach",
            "bank_account_holder_name": "Amazon Web Services Inc",
            "dim_department": "OPS",
            "dim_cost_center": "CC-200"
        }
    ]
)
Example: Import Chart of Accounts
manage_imports(
    action="accounts",
    legal_entity_id=74,
    records=[
        {"account_number": "1000", "account_name": "Cash", "account_type": "asset", "normal_balance": "debit"},
        {"account_number": "2000", "account_name": "Accounts Payable", "account_type": "liability", "normal_balance": "credit"},
        {"account_number": "4000", "account_name": "Revenue", "account_type": "revenue", "normal_balance": "credit"},
        {"account_number": "5000", "account_name": "Cost of Goods Sold", "account_type": "expense", "normal_balance": "debit"},
    ]
)
Example: Import Opening Balances
manage_imports(
    action="opening_balances",
    legal_entity_id=74,
    records=[
        {"account_number": "1000", "fiscal_period_name": "2026-01", "debit_amount": 150000.00, "credit_amount": 0},
        {"account_number": "2000", "fiscal_period_name": "2026-01", "debit_amount": 0, "credit_amount": 50000.00},
        {"account_number": "3000", "fiscal_period_name": "2026-01", "debit_amount": 0, "credit_amount": 100000.00},
    ]
)
Dry Run Before Committing
Always test imports with validate_only=True first. Validation runs all business rules and returns errors without writing any data:
manage_imports(
    action="vendors",
    legal_entity_id=74,
    validate_only=True,
    records=[...]
)
Duplicate Handling
Control how existing records are treated with on_duplicate:
"skip"— ignore duplicates, import new records only (default)"update"— overwrite existing records with imported data"error"— treat any duplicate as an import failure
Getting the Full Field List
To see every required and optional field for any entity type, use manage_onboarding:
manage_onboarding(
    action="get_support",
    support_type="import_vendors"  # or: import_customers, import_accounts, import_employees,
                                   #     import_items, import_transactions, import_fixed_assets,
                                   #     import_dimension_types, import_dimension_values,
                                   #     import_opening_balances
)
This returns the complete field schema with descriptions, data types, valid enum values, and example records. You can also use get_workflow_schema for a structured JSON schema:
get_workflow_schema(
    object_type="vendor",  # or: customer, account, employee, item, etc.
    operation="create"
)
Alternatively, open the Bulk CSV Upload wizard in the admin panel (Path C) — Step 3 (Map Fields) displays all available target fields for each entity type with descriptions and sample values.
For the full MCP tool reference, see the Bulk Import reference docs.
Path F: API
The REST API provides direct programmatic access to the import system. Send a POST request to /api/import/submit-csv with your CSV data and import configuration as a multipart form payload.
The API uses the same processing engine as the admin UI wizard — the same field mapping, validation, entity resolution, and progress tracking apply.
For large imports (more than 50 records), the API returns an import ID immediately and processes the data asynchronously. Poll GET /api/import/status/{import_id} for progress.
For full API documentation including request schema, authentication, and response formats, see the API reference docs at /docs/api.
Verify Your Migration
After importing all entity types, run these checks before going live.
Verification Checklist
- Run a trial balance — Ask Claude: "Run a trial balance for [your entity] as of [migration date]." Total debits should equal total credits. If they do not, check your opening balances import.
- Spot-check a vendor — Pick a vendor from your source system and verify the record in Arfiti. Check that bank account and dimension tags were imported correctly.
- Spot-check a customer — Verify billing and shipping addresses transferred correctly.
- Check the import history — Go to Administration > Bulk Import > History. All completed imports should show a green "Completed" status with zero errors.
- Verify item numbers — Confirm item numbers were preserved from your source system and were not auto-generated. Transactions reference items by item number.
- Test a transaction — Post a test AP invoice using one of your imported vendors. Confirm the vendor resolves correctly and the GL posting hits the expected accounts.
- Verify opening balance period — Confirm your opening balances are showing in the correct fiscal period. Ask Claude: "What is the opening balance for account 1000 in period 2025-01?"
Common Issues and Fixes
"FK constraint violation" or "record not found" errors on transaction import
Your transactions are referencing a vendor, customer, account, or item that does not exist yet. Check the import order — transactions must come after all referenced entities. Re-run the earlier import steps, then retry transactions.
"Required field missing" error
A required field was not mapped in Step 4 of the wizard. Go back to the field mapping step and either map the column or set a default value. The error message will include the field name.
Duplicate records appearing after import
You imported the same file twice without setting duplicate handling to "Skip". If the records are identical, delete the duplicates manually in the admin panel. For future imports, the wizard defaults to "Skip" — leave it at the default unless you specifically need to update existing records.
Trial balance does not match source system
Check that your opening balance period matches your migration cutover date exactly. Also verify that the balance signs are correct — some systems export asset accounts as positive and liability accounts as negative, while others invert this. Adjust your CSV and re-import with duplicate handling set to "Update".
CSV preview shows garbled characters (â€" instead of —)
Your CSV is not UTF-8 encoded. Open it in a text editor, save as UTF-8, and re-upload.
Tip: After fixing errors, re-import with Duplicate Handling set to Skip. Records that imported successfully the first time will be skipped automatically — only the rows that failed will be processed.
What's Next
Once your data is migrated and verified, you are ready to start using Arfiti for day-to-day operations.
Talk to Claude to:
- Post AP and AR invoices: "Post this invoice from AWS for $5,200, expense to Cloud Infrastructure."
- Run reports: "Show me an aged payables report as of today."
- Reconcile bank statements: "Reconcile the EUR account for March."
- Process payroll: "Run payroll for all active employees for the March period."
Your migration is the foundation. From here, Claude handles the operations.